If you've ever bought a wooden train set for your child, you probably know how it starts. A few curved tracks, some straight pieces, a little engine, and maybe a bridge.
Then you buy another set. And another one.
Before you know it, there's a box full of wooden tracks under the bed, and you're trying to figure out why two pieces won't connect or what that strange-looking junction is supposed to do.
The good news? Wooden railway tracks aren't as complicated as they first appear.
Most wooden train systems use a handful of basic track types. Once you know what each one does, building bigger and more interesting layouts becomes much easier.
Let's go through them.
Understanding Wooden Train Track Pieces
There are quite a few different wooden railway pieces available, especially if you start collecting older BRIO tracks or mixing sets from different manufacturers.
But most fall into these groups:
| Track type | What it's used for |
|---|---|
| Straight tracks | Connecting sections and extending railway lines |
| Curved tracks | Making turns, circles and loops |
| Switching tracks | Sending trains in different directions |
| Crossing tracks | Letting railway lines cross each other |
| Ascending tracks | Building bridges and elevated routes |
| Buffer stops | Ending a railway line |
| Ramp tracks | Helping trains move between tracks and the play surface |
You don't need every type to build a good railway.
In fact, a few straight and curved pieces are enough for plenty of layouts. The more unusual tracks become useful when you want to try something different.
1. Straight Wooden Train Tracks
Simple pieces, but you'll use them all the time.
Straight tracks are the backbone of a wooden railway. They connect curved sections, extend railway lines and give you space for stations, bridges or extra branches.
They come in different lengths.
Older BRIO track guides use the following identification codes. The reference lengths below are based on BRIO's historical track geometry, not measurements guaranteed for every brand:
| Code | Track type | Approximate length |
|---|---|---|
| A2 | Mini Straight Track | 54 mm |
| A1 | Short Straight Track | 108 mm |
| A | Medium Straight Track | 144 mm |
| D | Long Straight Track | 216 mm |
Some identification illustrations round these dimensions to the nearest few millimetres. For precise layout planning, refer to the measurements for your own track system.
Which straight tracks do you actually need?
Long tracks are great when you have plenty of floor space. They make it easier to create a railway that stretches across the room.
Short tracks are a different story.
At first, they don't seem very exciting. But when you're almost finished building a layout and there's a small gap between two sections, a short piece can save the day.
We've all seen those wooden railway layouts that almost connect. Sometimes all that's missing is one little track.
Also, keep an eye on the connectors. Two tracks of the same length can have different male and female connector arrangements.
2. Curved Wooden Train Tracks
If straight tracks take trains from one place to another, curved tracks make sure they can turn around.
Without curves, you're basically building a very long railway that goes nowhere.
There are two common types:
Short curved tracks (E1)
These make tighter turns. They're handy for smaller layouts or when you're trying to fit a railway onto a train table.
Standard curved tracks (E)
These are used to build larger curves and simple railway loops.
You can combine curved and straight tracks to make circles, ovals and other shapes.
What about double curved tracks?
Double curved tracks are designed for two parallel railway paths.
They're not usually the first pieces you need, but they can be useful when building a larger railway network with two lines running alongside each other.
Older BRIO track charts also show short double curves (EE1) and larger double curves (EE). Their historical reference radii are 90 mm and 182 mm respectively; these are curve radii, not the overall length of each piece.
If you have some old wooden tracks from a secondhand collection, you might find pieces like these mixed in.
3. Switching Tracks: Where Things Get Interesting
This is probably where wooden train layouts start getting really fun.
A switching track, also called a railway point or junction, allows a train to take a different route.
Instead of running around the same circle again and again, the train can move onto another line.
You could use one to build a station, for example.
The main railway continues straight ahead, while a second track branches off to a platform where another train is waiting.
Straight switches (F and G)
These are basic switching pieces that divide the railway into different routes.
They're useful for creating extra branches or connecting parts of a layout.
Parallel switches (F1 and G1)
These help create parallel railway sections.
You might use them when building a railway with two tracks running next to each other.
Three-way switches (F2 and G2)
These offer more branching possibilities.
They can be useful for larger stations or railway yards with several routes.
Curved switches (L and M)
Curved switching tracks combine a curve and a junction.
They can save space when you want to add another route without using too many separate pieces.
Mechanical switches (L1 and M1)
Some wooden railway systems include mechanical switches with a movable mechanism that controls which route a train follows.
These can be particularly useful when playing with battery-powered trains.
One thing worth remembering: not all switches work the same way, even when they look similar.
4. Crossing Tracks
Crossing tracks are a little different from switches.
A switch lets a train change routes. A basic crossing simply allows two railway lines to cross.
Imagine building a figure-eight railway. At some point, the tracks have to cross each other. That's where a crossing piece comes in.
There are several types.
H — Crossing Track
A traditional four-way crossing with tracks meeting at right angles.
H1 — Cross Track
A smaller crossing with a different shape and footprint.
H2 — Criss-Cross Track
A diagonal crossing arrangement.
K — Switching and Crossing Track
A more complicated piece that combines multiple routes and track intersections.
X — Star Switch
One of the more unusual wooden railway pieces. It offers several connections and can be used in complex layouts.
Do you need a star switch for a basic wooden train set? Probably not.
But if you enjoy building complicated tracks with lots of different routes, it's certainly an interesting piece.
5. Ascending Tracks and Bridges
A flat railway is fine, but adding a bridge makes things much more interesting.
Ascending tracks help connect the railway on the floor to an elevated section.
Traditional track charts identify these pieces as N and N1.
They're often used together with bridge supports.
There is one thing you should check before making a big elevated railway: Can your trains actually climb it?
Some battery-powered engines have trouble with steep slopes, particularly when pulling several wagons.
It's a good idea to test the incline before completing the whole layout.
A bridge that looks great but stops your train every time isn't much fun.
6. Buffer Stops and Ramp Tracks
Not every railway line has to connect back into a circle.
Sometimes you want a railway to end at a station, storage yard or loading area.
That's what buffer stops are for.
Buffer stops (R and S) sit at the end of a track and help prevent trains from rolling straight off.
They're small pieces, but useful when you're creating a railway station with several platforms.
Ramp tracks (U and V) provide a transition between the wooden track and the surrounding play surface.
You might not use them in every layout, but they're nice to have when you start experimenting with different railway designs.
7. How to Identify Wooden Train Tracks
So, let's say you've just bought a box of secondhand wooden train tracks.
There are straight pieces, curves, switches, and a few strange ones you can't identify.
Where do you start?
First, separate the straight and curved tracks. These will probably make up most of the collection.
Next, put the switches and crossings into another group. Anything with three or more connections is worth checking more closely.
Then look at the connectors. Are both ends the same, or does one have a peg and the other a hole?
Measuring the tracks can also help.
If you're working with older BRIO pieces, the traditional track identification codes can be a useful reference.
Wooden Railway Track Identification Chart
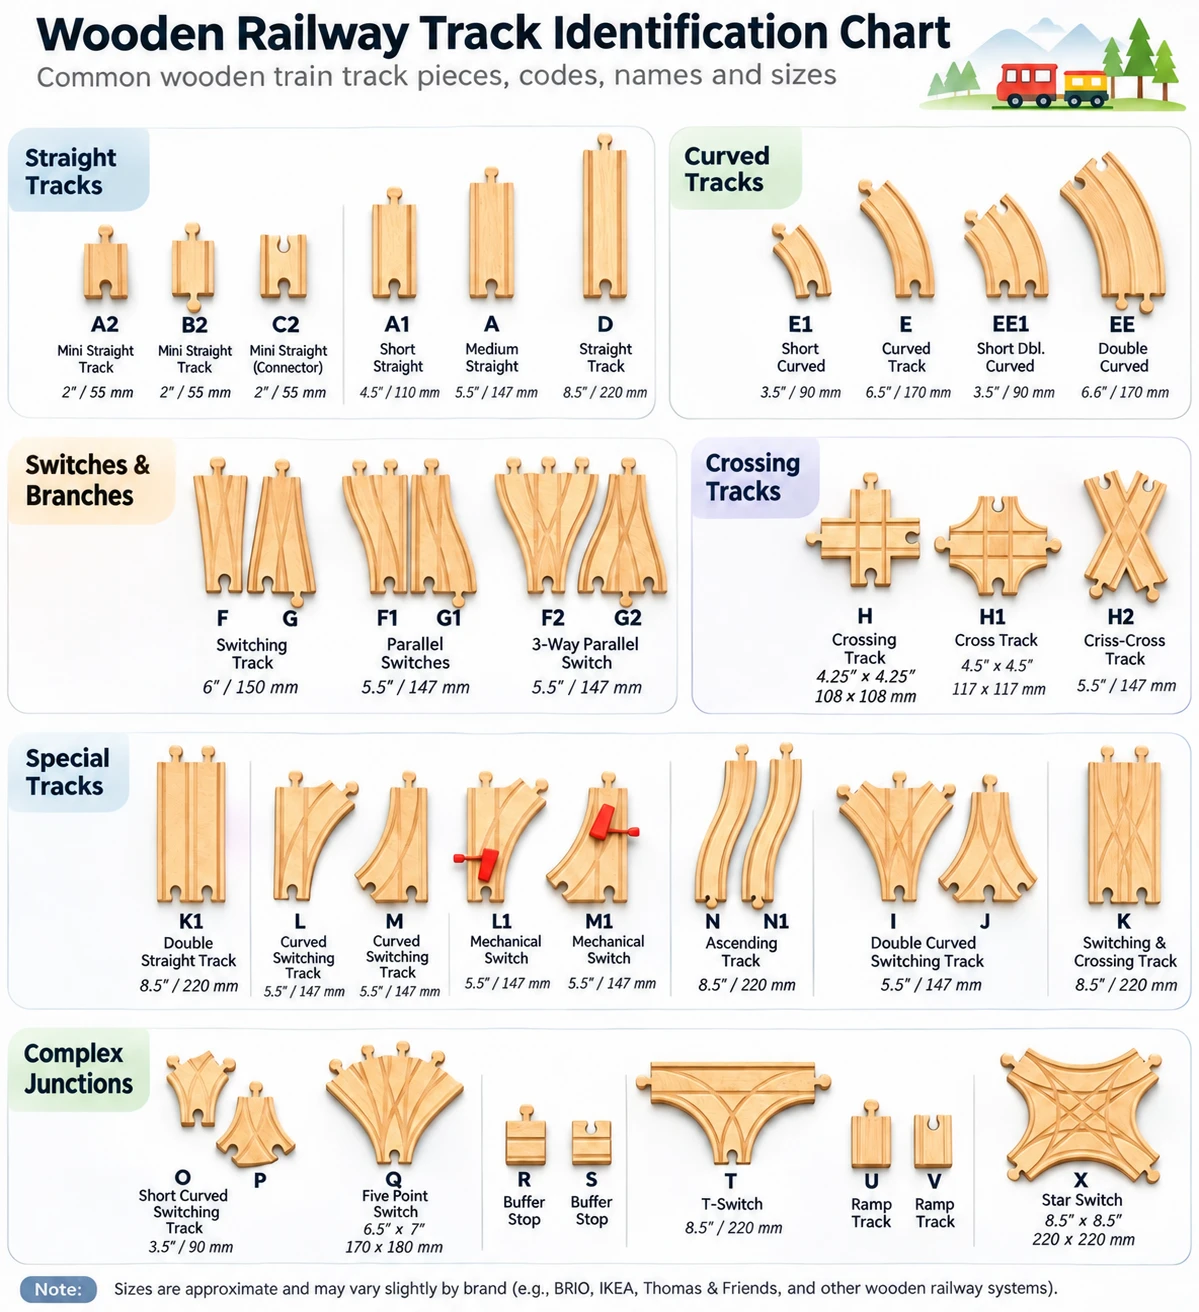
DodoRails illustrated reference chart. Codes are historical BRIO-style identifiers, not universal part numbers. The inch and millimetre labels on this illustration are approximate and should not be used as precise cutting or layout dimensions. The H crossing is shown as 108 × 108 mm. Curved-piece figures should not be confused with their radii.
Our illustrated chart brings together straight tracks, curves, switches, crossings and some less common junctions. It includes historical BRIO-style letter codes; not every pictured piece is commonly sold today.
Keep in mind that the codes in older BRIO charts don't necessarily apply to every brand or modern set.
It's a reference guide, not a universal numbering system.
8. Can You Mix Wooden Train Tracks from Different Brands?
This is one of the first questions parents ask when they start buying more wooden railway sets.
Can you combine BRIO, IKEA LILLABO and other wooden tracks?
Often, yes—but not always.
Many manufacturers use similar wooden railway connections, and pieces from different brands may fit together quite well. IKEA says LILLABO uses established dimensions and is usually compatible with many other railway systems, but it does not guarantee every combination.
But there's a difference between two tracks connecting and two tracks working perfectly together.
A small difference in height, width or connector shape might cause trouble.
Curved tracks can also have different geometry, making it harder to complete a loop.
And battery-powered trains may have problems with uneven joints.
Before investing in a large collection from another brand, try connecting a few pieces together.
Check whether the tracks line up and whether your trains can move through the connections without getting stuck.
That's usually more useful than simply assuming everything is compatible.
For a closer look at wooden railway systems, read our guide to choosing wooden train sets.
You can also explore our IKEA LILLABO train set guide.
9. Five Wooden Train Track Layouts to Try
Once you know the basic pieces, you can start building different layouts.
You don't need a huge collection, either.
The Circle
The easiest place to start.
A circle made from curved tracks lets a train run continuously without stopping.
Great for younger children who are just getting used to wooden train sets.
The Oval
Start with a circle and add straight sections on opposite sides.
You now have a longer railway with space for stations, tunnels or bridges.
The Figure Eight
A classic railway layout.
You'll need a suitable crossing piece and enough curved tracks to create two connected loops.
The Station Layout
Add a switch to the main railway and build a second track leading to a station.
A buffer stop can be used to finish the branch.
This is a nice layout for children who enjoy loading passengers, moving trains between platforms or creating little stories.
The Bridge Layout
Add an elevated section with ascending tracks and a bridge.
It's a fun way to introduce some height into a wooden railway.
Just make sure the supports are stable before sending a train across.
For now, try one layout at a time using the pieces you have. A simple loop is often the best place to test whether mixed-brand tracks and trains work together.
10. A Few Common Questions
What wooden train tracks should I buy first?
Start with straight and curved pieces. They're useful in almost every layout.
Once you have enough to build a few basic shapes, add switches, crossings and maybe a bridge.
Why won't my wooden train tracks connect?
Sometimes the connectors are facing the wrong way.
Other times, the pieces might come from different systems or use slightly different dimensions.
Try another track arrangement before assuming the pieces are incompatible.
Are all wooden train tracks the same size?
No. Even brands with similar-looking tracks may have small differences in size and shape.
This is especially noticeable when combining curves or building complicated layouts.
Can battery-powered trains use normal wooden tracks?
Many battery-powered wooden railway trains are designed for standard wooden tracks, but compatibility depends on the model.
Check the manufacturer's recommendations and test switches, bridges and tight curves before building a large layout.
Do I need lots of track pieces?
Not really.
A smaller collection can still create plenty of interesting layouts. Adding a few different junctions often makes more difference than buying another box of straight tracks.
A Railway That Grows With Your Collection
Wooden railway sets are one of those toys that can keep growing over time.
You start with a circle. Then you add a station, a bridge, another train, and suddenly half the living room has turned into a railway network.
Knowing the different wooden track types makes it easier to plan layouts, buy the right extra pieces and make use of tracks you already own.
And if you find a strange-looking wooden track in an old box, don't throw it aside just yet.
It might be exactly the piece you need for your next layout.